With the direction of technology nowadays, live streaming is highly in demand. Not only in the video space but the gaming market as well. It seems that it is not clear to many what it means to live stream a game. In this post I aim to go over how and why you might consider building your game to be streamed rather than downloaded by your end users.
Live Streaming a Game’s Content
Usually, when live streaming a game’s content, instead of downloading the entire contents of a game and running it on your machine, you are instead running the game on an external machine and only receiving visual and audio feedback while providing input through a mouse, keyboard, etc. There are some ups and downs to using a live streaming approach, I will leave it up to you to decide if it is worth it or not.
Advantages
-
Supports cross platform games.
-
Applies and enforces updates instantly.
-
Synchronizes every user’s experience.
-
Eliminates wait times for downloading.
-
Reduces cheating.
-
Helps protect your work.
Disadvantages
-
Requires an internet connection capable of live streaming content.
-
Servers must constantly be available.
Even if you decide this is not for you, I still think the technology is interesting enough the merit reading further. You never know when you might need something like this. This project is a prototype and is all contained within one javascript file and run in Node.
Initializing the HTTP Server
To start off, I built out a simple HTTP server using Express. Express is a fast, unopinionated, minimalist web framework for node. It has always been easy for me to quickly set and maintain an Express application no matter the technical need. It is easy to use and memorize and I highly recommend you add it to your toolkit. Our server opens endpoints for getting the html, css, and javascript necessary for running the code in a browser.
const express = require("express");
const http = require("http");
const app = express();
const server = http.createServer(app);
app.get("/", (_, res) => {
    res.header("Content-Type", "text/html");
    res.send(ClientHTML);
});
app.get("/index.css", (_, res) => {
    res.header("Content-Type", "text/css");
    res.send(ClientCSS);
});
app.get("/index.js", (_, res) => {
    res.header("Content-Type", "text/javascript");
    res.send(ClientJS);
});
server.listen(80, () => console.log("ready"));
I then use Socket.IO in order to enable real-time bidirectional event-based communication. This library makes it easy to send data to named events between the server and the client. I use it to send video and audio from the server and to listen to input commands from the client.
const socket = require("socket.io");
const { Server } = socket;
const io = new Server(server);
My visual library of choice is canvas. This library is a is a Cairo-backed Canvas implementation for Node.js. If you are familiar with javascript’s canvas apis you will feel right at home with this library. With it, we can draw all of our components, then share the pixel data with the client.
const { createCanvas } = require("canvas");
const WIDTH = 300;
const HEIGHT = 150;
const canvas = createCanvas(WIDTH, HEIGHT);
const context = canvas.getContext("2d");
The final server-side library I use is a simple and flexible audio buffer loader called audio-loader. This library is essential for converting my audio files to raw PCM data that I can send to the client whenever I want to play a sound effect or music.
const audioLoader = require("audio-loader");
const beeper = new Promise((resolve, reject) => {
    audioLoader("./beeper.wav", (err, data) => {
        if(err) reject(err);
        else resolve(data);
    })
});
Connecting to the Server
I use the Socket.IO’s connections io.on(“connection”, callback) function in order to detect a new connection. I then initialize a couple of variables I will need in order to track the state of the user’s mouse and bouncing square.
const SQUARE_SIZE = 10;
const random = (min, max) => {
    return Math.floor(Math.random() * (max - min)) + min;
};
// the mouse starts at the middle of the screen
const mouse = {
    x : canvas.width / 2,
    y : canvas.height / 2
};
// start with a random velocity direction
const theta = random(0, 360) / 180 * Math.PI;
// a bouncing cube
const square = {
    size : {
        width : SQUARE_SIZE,
        height : SQUARE_SIZE
    },
    location : {
        x : random(0, canvas.width - SQUARE_SIZE),
        y : random(0, canvas.height - SQUARE_SIZE)
    },
    color : "red",
    velocity : {
        x : 100 * Math.cos(theta),
        y : 100 * Math.sin(theta),
    }
};
let lastUpdate = Date.now();
The client-side actually has a lot of the necessary dependencies already built in. The only one extra is Socket.IO which is already available when we set it up earlier on the server.
// video handler
const canvas = document.querySelector("canvas");
const context = canvas.getContext("2d");
// socket connection handler
const socket = io();
// audio handler
const audioContext = new AudioContext();
Handling the Video Feed
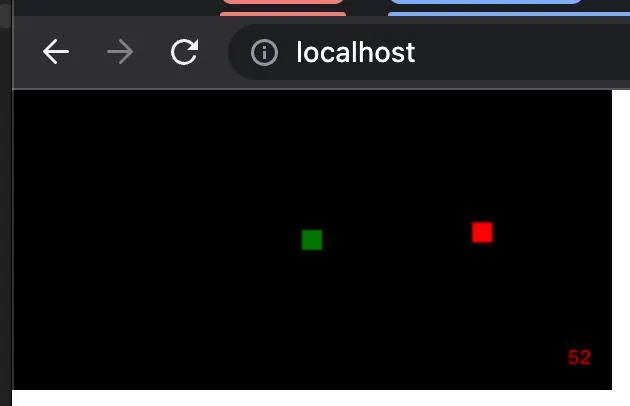
Here we draw the components on the server. We begin by clearing the canvas. We follow that up by drawing the bouncing square. We then show the frames per second after doing some math. Finally, we center a box around the last known coordinate of the user’s mouse. After drawing, we send the generated pixel data to the client.
const draw = (canvas, square, mouse, diff) => {
    // clear
    context.clearRect(0, 0, canvas.width, canvas.height);
    // rect
    context.fillStyle = square.color;
    context.fillRect(square.location.x, square.location.y, square.size.width, square.size.height);
    // fps
    context.textAlign = "right";
    context.textBaseline = "bottom";
    context.fillStyle = "red";
    context.fillText(Math.floor(1 / diff), canvas.width - 10, canvas.height - 10);
    // mouse
    context.fillStyle = "green";
    context.fillRect(mouse.x - 5, mouse.y - 5, 10, 10);
};
// keep track of time between updates
const video = setInterval(() => {
    const now = Date.now();
    const diff = (now - lastUpdate) / 1000;
    lastUpdate = now;
    // handle video
    draw(canvas, square, mouse, diff);
    const data = context.getImageData(0, 0, canvas.width, canvas.height).data;
    socket.emit("video", {
        x : 0,
        y : 0,
        width : canvas.width,
        height : canvas.height,
        data
    });
    // update (also handles audio)
    update(socket, square, diff);
}, 1000 / 60);
socket.on("disconnect", () => {
    clearInterval(video);
});
Handling the video on the client-side is simply a matter of copying the pixel data sent from the server to the client’s canvas. We could save some memory and time by not copying over the alpha channel but optimizing is not our goal right now.
socket.on("video", event => {
    // use rgba data as 8 bit numbers
    const data = new Uint8Array(event.data);
    // copy the server's canvas to the browser's canvas
    const id = context.getImageData(event.x, event.y, event.width, event.height);
    for(let i = 0; i < id.data.length; i++) {
        id.data[i] = data[i];
    }
    context.putImageData(id, 0, 0);
});
Handling User Input
We want to add a simple mouse tracker. This could represent an in-game cursor. All we need to send from the client are the exact mouse coordinates as it travels across the canvas.
canvas.onmousemove = event => {
    socket.emit("mousemove", {
        x : event.pageX,
        y : event.pageY
    });
};
All we have to do on the server is apply the values sent over, our draw function will handle the update automatically. There is a slight delay from the event since it takes some time both to send the mousemove event and receive the updated video event.
socket.on("mousemove", event => {
    mouse.x = event.x;
    mouse.y = event.y;
});
Handling the Audio Feed
We use our audio loader library to prepare the audio feed for when we need to send the sound effect to the client. Whenever the square bounces off of a wall it will project a sound.
const bounce = socket => {
    beeper.then(data => {
        socket.emit("audio", {
            id : "bounce",
            length : data.length,
            numberOfChannels : data.numberOfChannels,
            sampleRate : data.sampleRate,
            duration : data.duration,
            channelData : data._channelData
        });
    });
};

const update = (socket, square, diff) => {
    // move the square around
    square.location.x = square.location.x + square.velocity.x * diff;
    square.location.y = square.location.y + square.velocity.y * diff;
    // bounce the square and make a sound
    if(square.location.x <= 0 && square.velocity.x < 0) {
        square.velocity.x = -square.velocity.x;
        bounce(socket);
    }
    if(square.location.y <= 0 && square.velocity.y < 0) {
        square.velocity.y = -square.velocity.y;
        bounce(socket);
    }
    if(square.location.x + square.size.width >= canvas.width  && square.velocity.x > 0) {
        square.velocity.x = -square.velocity.x;
        bounce(socket);
    }
    if(square.location.y + square.size.height >= canvas.height  && square.velocity.y > 0) {
        square.velocity.y = -square.velocity.y;
        bounce(socket);
    }
};
The client simply needs to initialize a new audio buffer and fill it with the required data sent from the server.
socket.on("audio", event => {
    const buffer = audioContext.createBuffer(event.numberOfChannels, event.length, event.sampleRate);
    for(let channel = 0; channel < buffer.numberOfChannels; channel++) {
        const buffering = buffer.getChannelData(channel);
        // use audio data as 32 bit numbers
        const data = new Int32Array(event.channelData[channel]);
        // copy the server's audio stream to the browser's audio stream
        for (let i = 0; i < buffer.length; i++) {
            buffering[i] = data[i];
        }
    }
    const source = audioContext.createBufferSource();
    source.buffer = buffer;
    source.connect(audioContext.destination);
    source.start();
});
Finishing Off the Client
The final step is to complete our final two static files:
ClientHTML
<!doctype html>
<html>
    <head>
        <link href="./index.css" rel="stylesheet" />
    </head>
    <body>
        <canvas width="${WIDTH}" height="${HEIGHT}"></canvas>
        <script defer src="/socket.io/socket.io.js"></script>
        <script defer src="./index.js"></script>
    </body>
</html>
ClientCSS
canvas {
    background : black;
}
body {
    margin : 0;
}
The final version of the source code. I have attached a preview of the live game below.